English
Deutsch
Info Letter No. 45 for September/October 1997
Copyright by HEXAGON Software 1997
TR1 - Girder Calculation
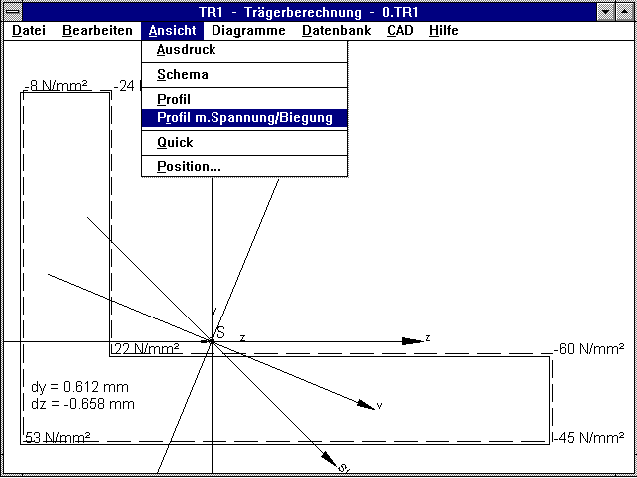 TR1 is new software for calculating girders of any cross-section. The
profile can be determined by entering the coordinates for the straight lines
and arcs, or loaded from GEO1. Data bases for L, T, I and U profiles in
accordance with DIN 1024-1028 are delivered with the software.
TR1 is new software for calculating girders of any cross-section. The
profile can be determined by entering the coordinates for the straight lines
and arcs, or loaded from GEO1. Data bases for L, T, I and U profiles in
accordance with DIN 1024-1028 are delivered with the software.
Possible bearing types are: fixed clamping, 2, 3, 4 or 5 ball-and-socket
joints (as with WL1). As with WL1, up to 50 radial forces, path loads,
bending moments and axial forces can be defined. However, calculation of
torsion and shearing stress is not possible with TR1, as a calculation of
elementary means is not possible. Section modulus, moments of inertia, main
axes and center of gravity of the cross-section, shearing force course,
bending moment course, bending angle, bending line, bending stress and
tension/pressure are calculated. For compression load, the influence of the
axial force on the bending line is taken into account. When buckling occurs
a warning appears. For any number of x-coordinates, the profile
cross-section with displaced profile and stress distribution in the
cross-section, can be displayed. The geometry of the cross-section and all
diagrams can be loaded into CAD as DXF or IGES files.
TR1 is available for delivery from December 1997 at a price of 1480 DM.
GEO1+ with Profile Data Base
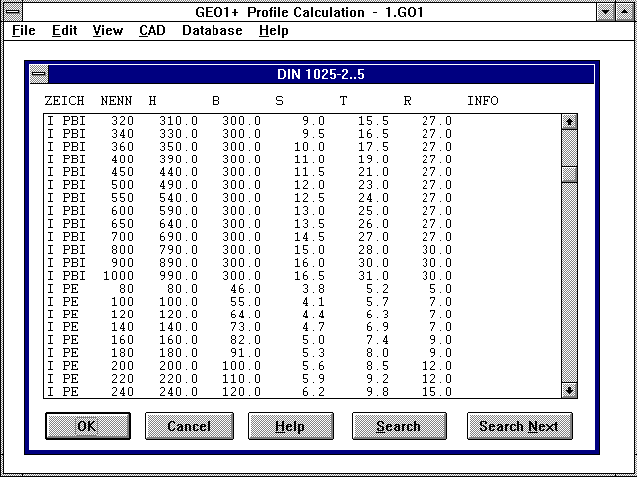 Our GEO1 Software for cross-section calculation is available with an
extended data base for T-profiles in accordance with DIN 1024, double
T-profiles in accordance with DIN 1025, L-profiles in accordance with DIN
1029, double L-profiles in accordance with DIN 1027, angle steel in
accordance with DIN 1028, U-steel in accordance with DIN 1026 and flat steel
in accordance with DIN 1017.
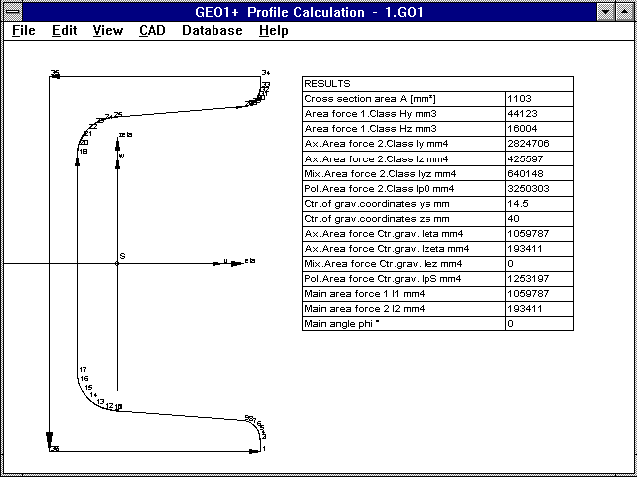
Click on the required profile, GEO1+
generates the geometry and calculates the surface moment of inertia, center
of gravity, position of zero point and weight of the girder. The geometry
can be output as DXF or IGES files and exported to CAD. The price for GEO1+
is 575 DM. Registered users of GEO1 can obtain an upgrade for GEO1 at a
price of 185 DM.
Our GEO1 Software for cross-section calculation is available with an
extended data base for T-profiles in accordance with DIN 1024, double
T-profiles in accordance with DIN 1025, L-profiles in accordance with DIN
1029, double L-profiles in accordance with DIN 1027, angle steel in
accordance with DIN 1028, U-steel in accordance with DIN 1026 and flat steel
in accordance with DIN 1017.
Click on the required profile, GEO1+
generates the geometry and calculates the surface moment of inertia, center
of gravity, position of zero point and weight of the girder. The geometry
can be output as DXF or IGES files and exported to CAD. The price for GEO1+
is 575 DM. Registered users of GEO1 can obtain an upgrade for GEO1 at a
price of 185 DM.
GEO1 - Coordination Transformation
The newest versions of GEO1 and GEO1+ allow you to enter the cross-section,
rotate it at any angle and displace it with the masses dy/dy. It is also
possible to increase or decrease, and different scales can be entered for
the y and z coordinates. In addition it is also possible to mirror the
profile along the y or z axis. This combination of methods allows an
entered cross-section to be altered in any way.
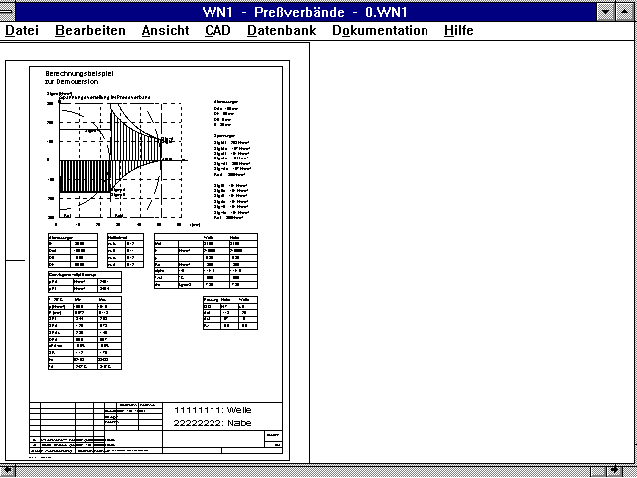
WN1 - Table Diagram
Our WN1 software for dimensioning of press and shrink fits now makes it
possible to generate a drawing on a drawing form with all the important
data from the stress diagram. The user can add the company logo to the
drawing header, or exchange the existing header for another. Changes are
registered in the change index and included in the drawing header. The
table drawing can be printed out with DXFPLOT on a laser printer or
exported to CAD via DXF/IGES files.
WL1+ Calculation for Avoidance of Buckling
Buckling can occur due to high axial forces or with long shafts.
The "Euler buckling force" can be calculated as critical axial force
for non-stepped shafts with the following formula:
pi≤ * E * Iy
FK = ---------------
l≤
FK: Euler buckling force
E: Elasticity modulus
Iy: Surface moment of inertia
l : Length of shaft or support
The formula cannot be used on stepped shafts. For this reason WL1 uses
a different method for calculation.
Axial compressive forces increase the bending of the shaft, tensile forces
reduce the bending. The new versions of WL1 and WL1+ better account for this
effect in the calculation of statically determined mounted shafts.
Due to axial forces, additional shearing force occurs as radial
components of FA, on a shaft already bent from other influences. WL1 first
calculates the deflection without axial force influence. Then the shearing
force share of the axial forces as shearing force are added and the shaft
is completely recalculated. The force application point, xa, is the location
of the highest deflection. The greatest bending angle is w1max, and wmax
is the angle of the greatest deflection in the yz plane.
FQ = sin(w1max) * FA
x = xa
phi= wmax
When deflection alters due to axial forces, the shearing force share of
Fax is calculated via iteration with the new bending angle, until a balance
is achieved. If deflection becomes greater and greater and is heading for
infinity, the shaft buckles, WL1 then displays an error message. The
share of the axial forces in deflection is included on the printout under
"Extreme Values".
WL1 - Force of Weight, Additional Mass
Under "Calculation", you can select having the force of weight due to
external additional mass automatically taken into account as path load. The
force of weight takes effect in the xy plane in a negative direction.
q = m*g/b
x1 = x-b/2
x2 = x+b/2
q: Path load in N/mm
m: Mass in kg
b: Width of additional mass in mm
g: 9.81 m/s≤
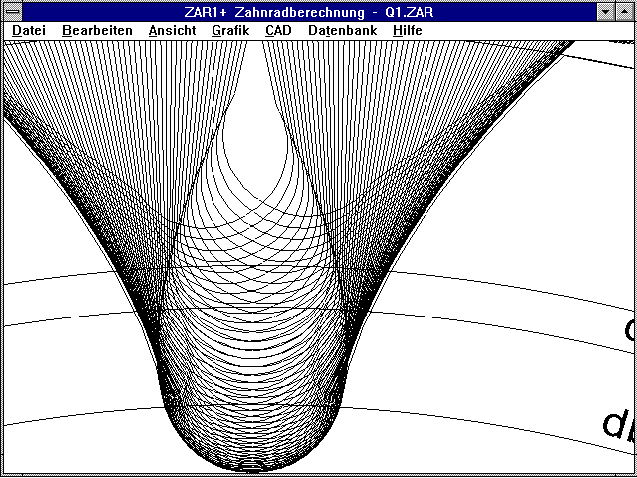
ZAR1 - Envelopes and Machining Allowance
The envelopes for high backlash and for machining allowance did not quite
agree with the drawn involutes (also see Info Letter 30). This has now been
corrected. Now, the tooth of envelopes in the pre-machining state, and the
involutes for the finished state are also drawn. Until now, the envelopes
and involutes for the pre-machining state were drawn and then q had to be
reset to q=0 in order to display the tooth contacts of the finished gear.
Changes to the generation addendum modification coefficient for involutes
and envelopes can be separately configured under "CAD->Tooth Shap->Config".
The diagram shows the gear wheel pre-machined with a protuberance
tool (see envelopes), the finished state is shown as involute.
ZAR1 Machining Allowance
In ZAR1/ZAR1+, the test measurements for the pre-machined toothing, have
until now, been given the same tolerance as for finished toothing, although
a greater deviation would be permissible here. The new version allows you to
enter a tolerance for the machining allowance q. This is then taken into
account with the test measurements and generation addendum modification
coefficient (pre-machined). The test measurement tables now show the
theoretical test measurements, then minimum and maximum values, as in the
printout. I would like to thank Mr Lamprecht of Zahnradwerk Pritzwalk for
this improvement suggestion.
WST1 - Haigh Diagram
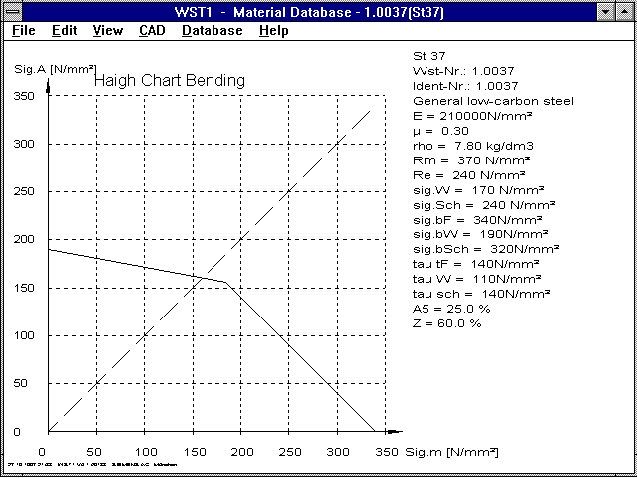 WST1 now also shows diagrams in accordance with Haigh, along with the Smith
diagrams for fatigue stress. The Haigh diagram shows the x axis as center
stress, and the y axis as deflection stress. When the part is to be
durable, the compound stress made up of Sigma m and Sigma A, must lay below
the Haigh curve.
WST1 now also shows diagrams in accordance with Haigh, along with the Smith
diagrams for fatigue stress. The Haigh diagram shows the x axis as center
stress, and the y axis as deflection stress. When the part is to be
durable, the compound stress made up of Sigma m and Sigma A, must lay below
the Haigh curve.
WST1 - Smith Diagrams
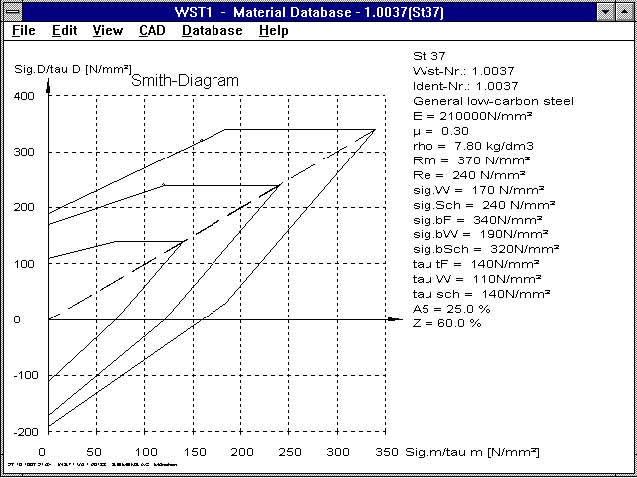 The Smith and Haigh diagrams for tension/pressure, bending and torsion can
be shown together as one diagram. Please make sure that the axis titles for
pressure/tension and bending are relevant to tension stress (Sigma) and for
torsion relevant to shearing stress (tau)
The Smith and Haigh diagrams for tension/pressure, bending and torsion can
be shown together as one diagram. Please make sure that the axis titles for
pressure/tension and bending are relevant to tension stress (Sigma) and for
torsion relevant to shearing stress (tau)
DXFMAN - GARMIN GPS Satellite Navigation
The DXF Manager software includes the new output format for converting a map
into a format, which can be read by a GPS receiver. With the Garmin GPS
receivers (http://www.garmin.com) you can determine your exact location on
the earth via satellite navigation. The distance covered is stored as
"Track" and prominent landmarks are saved as "Waypoints". The instruments
have a PC interface. With the software delivered, you can show the Tracks
and Waypoints on screen as a map, and they can be output as a DXF file. The
x-coordinate is the east/west line of latitude, and the y-coordinate is the
north/south line of longitude in degrees. With the DXF Manager you can now
convert map drawings into GPS files. Only two drawing elements are used:
polylines are converted to "Tracks" and text is converted to "Waypoints".
You can now work out a route on the DIGITALISIERTTABLETT and transfer this
to your GPS instrument. In order to calibrate, you mark two points on the
y-axis with the degrees from the topographical map. Then you draw your
route as a poly line and mark the landmarks as text. The text entry mark is
the coordinate of the landmark. Then save the drawing as a DXF file and
convert this into a Garmin file, which can then be loaded into the GPS
receiver. Now you can go out into the terrain. With satellite navigation
you can now determine the direction and distance from each of the marked
waypoints in relation to your position on earth, or you can simply follow
the digitalised course.
Garmin file from DXFMAN:
H  SOFTWARE NAME & VERSION
I  PCX5 2.08
H  R DATE                 IDX DA            DF            DX            ...

M  G WGS 84               121 +0.000000e+00 +0.000000e+00 +0.000000e+00 ...

H  COORDINATE SYSTEM
U  LAT LON DM

H  LATITUDE    LONGITUDE    DATE      TIME     ALT    ;track
T  N4830.05205 E00936.21831 10-AUG-97 13:24:04 -9999
T  N4830.04561 E00936.21928 10-AUG-97 13:24:19 -9999
T  N4830.02147 E00936.23473 10-AUG-97 13:25:04 -9999

H  IDNT   LATITUDE    LONGITUDE    DATE      TIME     ALT   DESCRIPTION
W  NEIDLI N4834.86007 E00933.66206 27-MAR-62 00:00:00 -9999 10-JUL-97 15:27
W  KIRCHH N4838.59371 E00927.16779 27-MAR-62 00:00:00 -9999 11-JUL-97 08:53
W  CHEB   N5005.01545 E01222.57396 27-MAR-62 00:00:00 -9999 16-JUL-97 12:09
W  KARLSB N5014.35790 E01253.75013 27-MAR-62 00:00:00 -9999 16-JUL-97 17:48
W  DRESDE N5100.80400 E01345.00007 27-MAR-62 00:00:00 -9999 09-JUL-97 20:43
W  MEININ N5034.63186 E01024.63616 27-MAR-62 00:00:00 -9999 08-AUG-97 16:03
DXFPLOT, DXFMAN, HPGLMAN
With the parameter "/V*=i" in the command line mode of the newest versions
of the DXF Manager, HPGL Manager and DXFPLOT, all colours with pen numbers
or line thickness can be printed out. For example, if you wish to print out
a diagram on a laser printer with DXFPLOT, in which all the lines have the
smallest line thickness, the command is as follows:
WDXFPLOT C:\DXFPLOT\DXFPLOT.DXF /CHPL /R /M* /V*=1
The parameters mean:
/CHPL: HPGL laser printer
/R: rotation by 90¯
/M*: greatest possible scale
/V*=1: all layers in line thickness 1
Spring Programs - Online-Input
 In the Windows versions, only the input field is in the foreground. The
results can be seen in the Quick Output. This has the advantage that you
have an overview of all calculated data and the spring characteristic curve.
In order to avoid a portion of the Quick Output window being covered by the
input window, the main window can be moved to the right. If you prefer to
continue working with the old online windows with output and error fields
you can set this in the graphic configuration by removing the "cross" for
"Online-Window small" then saving the configuration.
In the Windows versions, only the input field is in the foreground. The
results can be seen in the Quick Output. This has the advantage that you
have an overview of all calculated data and the spring characteristic curve.
In order to avoid a portion of the Quick Output window being covered by the
input window, the main window can be moved to the right. If you prefer to
continue working with the old online windows with output and error fields
you can set this in the graphic configuration by removing the "cross" for
"Online-Window small" then saving the configuration.
FED1+,FED2+ External Mass
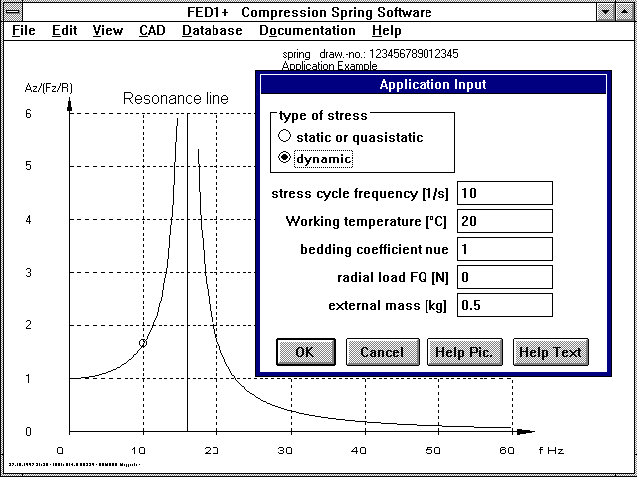 The frequency play of the spring in resonance range can be calculated by
FED1+ and FED2+. As these curves are usually not relevant for the naked
spring, but in relation to the moving mass, it is now possible to define an
external mass under "Application". When m=0, then the frequency play will
be calculated as it has been up until now. If a mass is entered, the
program calculates the frequency play of the spring-mass system.
The frequency play of the spring in resonance range can be calculated by
FED1+ and FED2+. As these curves are usually not relevant for the naked
spring, but in relation to the moving mass, it is now possible to define an
external mass under "Application". When m=0, then the frequency play will
be calculated as it has been up until now. If a mass is entered, the
program calculates the frequency play of the spring-mass system.
FED1+ Buckling Range
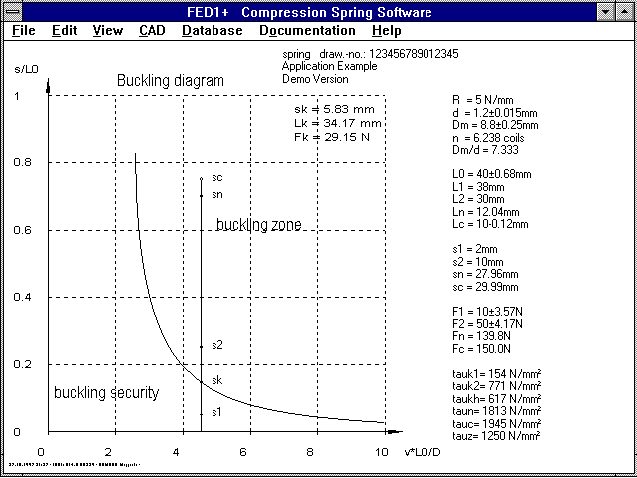 The buckling diagram shows the values for the spring path sk, at which the
spring buckles, as well as the relevant spring force Fk and the spring
length Lk. I would like to thank Mr Eriksson and Mr Wolf of Stockholms
Fj‰der for this idea.
The buckling diagram shows the values for the spring path sk, at which the
spring buckles, as well as the relevant spring force Fk and the spring
length Lk. I would like to thank Mr Eriksson and Mr Wolf of Stockholms
Fj‰der for this idea.
FED1 Manufacturing Adjustment
No degree of quality or tolerance is output for L0 with a manufacturing
adjustment. The manufacturing adjustment is included in the Quick Output,
and the tolerances for the coil diameter are only shown once. For this
suggestion I would like to thank Mr Leicher of Klîckner-Moeller.
Spring Material Data Base
The material name from the new material data bases in the spring programs
did not always appear in the manufacturing drawings. The error has been
corrected. The material data base has been extended with a field for
material number (maximum of 9 characters). This improves coupling with the
spring data bases.
FED5 - Outward Bending of End Coils
With the conical helical compression spring the coils with the greatest
coil diameter flatten first. With further pressing, the flattened coils
experience the spring force as pressure with radial and axial components.
The axial component can cause bending out of the end coils and the
flattened coils along the side of the greatest coil diamter. This results in
the block length, Lc, being smaller than calculated. Due to the relief
effect the forces become smaller and the characteristic curve becomes
flatter than in theory. With FED5 you can partially compensate for the
effects of the end coils bending out, by setting the number of end coils to
zero. For the future we are researching how this can be better compensated
for in FED5. I would like to thank Mr Striegl of Technomatik in Dietramzell
for providing us with springs and information.
Homepage